Saturday, June 24, 2017

Extract payload information using custom sequence - WSO2 API Manager

Anyone can easily plug in a custom logic to WSO2 API manager to process request/response payloads using Mediation Extensions feature. Following two custom sequences can be used to evaluate payload with content type application/x-www-form-urlencoded and application/json

1. application/x-www-form-urlencoded


<?xml version="1.0" encoding="UTF-8"?>
<sequence xmlns="http://ws.apache.org/ns/synapse" name="form_data">
  <property name="LastName" expression="//xformValues//lastName/text()"/> 

  <log level="custom">
    <property name="Log: LastName" expression="get-property('LastName')" />
  </log>
</sequence>
Sample request
curl -k -X POST -H 'Authorization: Bearer 95b59dfc-aae1-3b85-aec7-93a0471fea42' -H "Content-Type: application/x-www-form-urlencoded" 'https://172.21.0.1:8243/test/1/*' -d 'lastName=chamila' 

2. application/json


<?xml version="1.0" encoding="UTF-8"?>
<sequence xmlns="http://ws.apache.org/ns/synapse" name="json_payload">
 
  <property expression="json-eval($.lastName)" name="LastName"/>

  <log level="custom">
    <property name="Log: LastName" expression="get-property('LastName')" />
  </log>
</sequence>


Sample request
curl -k -X POST -H 'Authorization: Bearer 95b59dfc-aae1-3b85-aec7-93a0471fea42' -H "Content-Type: application/json" 'https://172.21.0.1:8243/test/1/*' -d '{"lastName":"chamila"} 

WSO2 API Manager: Access user attributes from a custom sequence


For some use cases, API developer may want to access the API invoker's user information (such as his email address, roles etc). Easiest method to access these information is by getting the user claims for that user. Following method describes how to access user claims and extract a selected claim using a custom sequence

1. Enable JWT token as mentioned in here. This token contains the user related claims and it is set to the X-JWT-Assertion header during the authentication process.

2. Create a custom mediator sequence using Mediation extension feature. Following is a sample mediation sequence that can be used to extract the claim from jwt token.


<sequence xmlns="http://ws.apache.org/ns/synapse" name="jwt_decoder">

<property name="jwt-header" expression="get-property('transport','X-JWT-Assertion')"/>

<script language="js">
var jwt = mc.getProperty('jwt-header').trim();
var jwtPayload = jwt.split("\\.")[1];
var jsonStr = Packages.java.lang.String(Packages.org.apache.commons.codec.binary.Base64.decodeBase64(jwtPayload));

var jwtJson = JSON.parse(jsonStr);

var roles = jwtJson['http://wso2.org/claims/role'];
mc.setProperty("roles",JSON.stringify(roles));
</script>

<log level="custom">
  <property name="USER_ROLES" expression="$ctx:roles"/>
</log>

</sequence>

Monday, June 27, 2016

An invalid security token was provided (Bad TokenType "") : workaround for Axis2 client


I recently came across this issue when trying to invoke a secured web service using Apache axis2 client application (Calling a WSO2 ESB secured web service which was secured using policy scenario 3 ). The reason for this error is that the response soap message coming from the secured web service is missing some headers in the security header section which are needed to be there to become a Basic Security Profile 1.1 compliance response.

Axis2 uses Apache Rampart to handle WS-Sec* related tasks. Rampart modules uses Apache WSS4J which has implementations for primary security standards for Web Services. Checking whether response is BPS compliance is done from this. Basic Security Profile 1.1 is an WS-I (Web Services Interoperability) specification. WSS4J implementation is done in a way to disable this check if needed. (The default is to check for compliance. but APIs are provided to disable this.) . But unfortunately Rampart does not have any configurations to disable this property . So as a result a web service client written using Axis2/Rampart can only talk to a web service which provides BSP compliance requests/responses. Apache CXF has a property to disable this. see 'ws-security.is-bsp-compliant' property in  http://cxf.apache.org/docs/ws-securitypolicy.html but not in axis2.

Following is the workaround I used to overcome this issue.

Since we cannot change the property (unless you recompile the Rampart module) , what we can do is update the payload with the missing values. Here I'm not changing any values returned with the security header, just adding a missing constant to the payload so that the header becomes BSP compliance one.

Following are the steps

1. Find what is missing in the security header.

Get the source code for Apache WSS4J . I used Apache Rampart 1.7.0 . WSS4J version for that is 1.6.16. You can download it from https://archive.apache.org/dist/ws/wss4j/ . BSP compliance is checked from the methods in this class org.apache.ws.security.str.BSPEnforcer.java . (Axis2 client error log will give you the exact method )

Following is the error I got

Caused by: org.apache.ws.security.WSSecurityException: An invalid security token was provided (Bad TokenType "")
at org.apache.ws.security.str.BSPEnforcer.checkEncryptedKeyBSPCompliance(BSPEnforcer.java:113)
at org.apache.ws.security.str.SignatureSTRParser.parseSecurityTokenReference(SignatureSTRParser.java:209)

BSPEnforcer.checkEncryptedKeyBSPCompliance() method shows   'wsse11:TokenType' attribute is missing in the 'wsse:SecurityTokenReference' element.

following is the SecurityTokenReference element from the response security header

<wsse:SecurityTokenReference
xmlns:wsu="http://docs.oasis-open.org/wss/2004/01/oasis-200401-wss-wssecurity-utility-1.0.xsd"
wsu:Id="STRId-5C264936DBA85C9F91146614733766082">
     <wsse:KeyIdentifier
EncodingType="http://docs.oasis-open.org/wss/2004/01/oasis-200401-wss-soap-message-security-1.0#Base64Binary"
ValueType="http://docs.oasis-open.org/wss/oasis-wss-soap-message-security-1.1#EncryptedKeySHA1">
ekLfmUNY3Rne2Q1YQLhLQJhu7KA=
</wsse:KeyIdentifier>
</wsse:SecurityTokenReference>

According to the BSP 1.1 spec SecurityTokenReference element should have a TokenType attribute to become a BSP compliance response.  See http://www.ws-i.org/profiles/basicsecurityprofile-1.1.html#EncryptedKeyToken  . Since this is a constant, I do not see any harm adding it to the element. Following is what the element should be to become a BSP compliance

<wsse:SecurityTokenReference 
    xmlns:wsu="http://docs.oasis-open.org/wss/2004/01/oasis-200401-wss-wssecurity-utility-1.0.xsd"
    wsu:Id="STRId-5C264936DBA85C9F91146614733766082"  
    xmlns:wsse11='http://docs.oasis-open.org/wss/oasis-wss-wssecurity-secext-1.1.xsd' 
    wsse11:TokenType='http://docs.oasis-open.org/wss/oasis-wss-soap-message-security-1.1#EncryptedKey'>
            <wsse:KeyIdentifier 
               EncodingType="http://docs.oasis-open.org/wss/2004/01/oasis-200401-wss-soap-message-security-1.0#Base64Binary" 
       ValueType="http://docs.oasis-open.org/wss/oasis-wss-soap-message-security-1.1#EncryptedKeySHA1">
ekLfmUNY3Rne2Q1YQLhLQJhu7KA=
    </wsse:KeyIdentifier>
</wsse:SecurityTokenReference>

Now we found the missing token. Lets see how we can inject that attribute to the security header

2. Update the Header with missing attribute

First you should take a look at how axis2 engine works (Basic understanding would be enough). see http://wso2.com/library/777/

As you can see, Axis2 contains two main flows (In flow to handle incoming messges and Out flow to handle requests going out from the client) and each flow consists of Phases to do some specific task in that flow . If you open the axis2.xml file comes with the Axis2 libraries and go to the 'Phases' section you would see them. In each flow you would see <phase name="Security"/> . This phase handles security related things (such as validating the security headers, etc)

As I mentioned earlier, my error happens when the axis2 client receives the response from the service.  It means response comes to the client and  message is going through the 'InFlow' and at the <phase name="Security"/> the validation fails. So I have to modify the message before it goes through Security phase.  (If the error is happening while request is sending to the service, then you have to do the modification after 'Security' phase in the 'OutFlow'. This is for scenario where backend is throwing the error )

To modify the message, you can write an axis2 handler and add it to a new phase and deploy it before the Security phase.

Modified axis2.xml to use with axis2 client

<phaseOrder type="InFlow">
         :
 :
        <phase name="PreSecurity">
        <handler name="CustomHandler" class="apache.axis2.customhanlder.CustomSecurityHandler"/> 
</phase>
        <phase name="Security"/>
         :
         :
</phaseOrder>


following is the handler code. It goes through the SOAP header element and update the SecurityTokenReference element

package apache.axis2.customhanlder;

import javax.xml.namespace.QName;

import org.apache.axiom.om.OMAbstractFactory;
import org.apache.axiom.om.OMElement;
import org.apache.axiom.om.OMFactory;
import org.apache.axiom.om.OMNamespace;
import org.apache.axiom.soap.SOAPEnvelope;
import org.apache.axiom.soap.SOAPHeader;
import org.apache.axis2.AxisFault;
import org.apache.axis2.context.MessageContext;
import org.apache.axis2.handlers.AbstractHandler;

public class CustomSecurityHandler extends AbstractHandler {   

@Override
public InvocationResponse invoke(MessageContext ctx) throws AxisFault {
SOAPEnvelope msgEnvelope = ctx.getEnvelope();
        SOAPHeader msgHeader = msgEnvelope.getHeader();      
       
OMElement securityHeader = msgHeader.getFirstChildWithName(new QName(
"http://docs.oasis-open.org/wss/2004/01/oasis-200401-wss-wssecurity-secext-1.0.xsd", "Security"));
OMElement signature = securityHeader
.getFirstChildWithName(new QName("http://www.w3.org/2000/09/xmldsig#", "Signature"));
OMElement keyInfo = signature.getFirstChildWithName(new QName("http://www.w3.org/2000/09/xmldsig#", "KeyInfo"));
OMElement securityTokenReference = keyInfo.getFirstChildWithName(
new QName("http://docs.oasis-open.org/wss/2004/01/oasis-200401-wss-wssecurity-secext-1.0.xsd",
"SecurityTokenReference"));

OMFactory fac = OMAbstractFactory.getOMFactory();
OMNamespace ns = fac.createOMNamespace("http://docs.oasis-open.org/wss/oasis-wss-wssecurity-secext-1.1.xsd",
"wsse11");

//adding the missing attribute
securityTokenReference.addAttribute("TokenType",
"http://docs.oasis-open.org/wss/oasis-wss-soap-message-security-1.1#EncryptedKey", ns);

        return InvocationResponse.CONTINUE;
}
}

Deploy the built jar with the modified axis2.xml and you would be able to invoke the BSP non compliant secured web service using a BSP compliant axis2 client.

Sunday, January 24, 2016

WSO2 API Manager 1.10.0 - API Lifecycle management based on user roles

WSO2 API manager user tasks can be categorized under three main  user roles. They are creator, publisher and subscriber. See Adding User Roles section in the product document for more information. Users with the creator and publisher roles can log in to the API manager publisher application and work on the API creation and management. 

Users with publisher permissions can change the lifecycle states of an api. He can deprecate the api, or block the api or even retire the api. From API Manager 1.10 onward, user can limit this capability and assign their own roles for this lifecycle state management. This way if someone does not want a user with only publisher permission to block an api, he can do it with API Manager 1.10.0 easily using the Custom Lifecycle Inclusion feature.

Scenario

The owner of the api does not want to give every one the permission to put his API in to Blocked state. He wants to assign it to a separate group. 

Steps:

1. Create a new role. 

See Adding User Roles. Here I create a new role "blockrole" for this scenario. You can assign any permission for this. I'll keep that empty since the grouping is done based on the role name.

2. Modify the existing lifecycle.  

For that Log in to API manager management console (https://localhost:9443/carbon) and navigate to 

Update the 'Published' state with the following

      <state id="Published">
              <datamodel>

                  <data name="transitionExecution">
                      <execution forEvent="Block"
                                       class="org.wso2.carbon.apimgt.impl.executors.APIExecutor">
                      </execution>
                      <execution forEvent="Deprecate"
                                       class="org.wso2.carbon.apimgt.impl.executors.APIExecutor">
                      </execution>
                      <execution forEvent="Demote to Created"
                                       class="org.wso2.carbon.apimgt.impl.executors.APIExecutor">
                      </execution>
                      <execution forEvent="Deploy as a Prototype"
                                       class="org.wso2.carbon.apimgt.impl.executors.APIExecutor">
                      </execution>

                  </data>
                        
                  <data name="transitionPermission">
                     <permission forEvent="Block" roles="blockrole" />
                  </data>

              </datamodel>
              <transition event="Block" target="Blocked"/>
              <transition event="Deploy as a Prototype" target="Prototyped"/>
              <transition event="Demote to Created" target="Created"/>
              <transition event="Deprecate" target="Deprecated"/>
              <transition event="Publish" target="Published"/>
       </state>


Note the newly added data element "transitionPermission" . The newly created role "blockrole" is assign for the event "Block".  

      <data name="transitionPermission">
          <permission forEvent="Block" roles="blockrole" />
      </data>


Test

Now log in to the API manager publisher (I will use the default admin user for this.)  and publish an api. Then go to the Overview section of the api and select the 'Lifecycle' tab and you will notice that the "Block" Operation is not there anymore.


The reason for this is the user admin does not have the role "blockrole". Now Log in the the Management console and assign the role "blockrole" to the admin user refresh the Lifecycle tab in the API manager publisher. You will notice the "Block" button in the tab.


You can extend this feature to provide different roles for different API Lifecycle states.

Saturday, January 23, 2016

WSO2 API Manager 1.10.0 - Introducing a custom Lifecycle to an API


WSO2 API Manager 1.10.0 comes with many new features. One of them is the facility to attach custom lifecycle to an API. API manager before 1.10 had only CREATED, PUBLISHED , DEPRECATED, RETIRED , BLOCKED, PROTOTYPED states for an api. With the new version, user can attach more states to an api.

WSO2 api manager uses WSO2 Governance registry Lifecycle features to implement this.  You can get more information about this from the Extending the API Life Cycle section in WSO2 api manager documentation

I'll use this feature to implement a scenario where user sends a notification about  a state change of an api.  this will implement a scenario where user sends an email notification to the business owner of the api when he retires the api.

Main steps:

1. Create a custom executor to handle the custom state change.

When creating a custom executor you have to use org.wso2.carbon.governance.registry.extensions.interfaces.Execution interface for the implementation and implement execute()method


import java.util.Map;
import org.wso2.carbon.governance.registry.extensions.interfaces.Execution;
import org.wso2.carbon.registry.core.jdbc.handlers.RequestContext;

public class CustomExecutor implements Execution {

    String param;

    @Override
    public boolean execute(RequestContext context, String currentState, String targetState) {
        if(something){
            return true;
        } else {
            return false;
        }
    }

    @Override
    public void init(Map arg) {
     param = (String) arg.get("param");

    }
}

For this scenario I created an executor to send email. See MailExecutor.java. You can pass parameters to the executor through the lifecycle.  Refere following property definition in the lifecycle on how this is done (In the next section)

<parameter name="emailUsername" value="xxxxxxxxxx" />
<parameter name="emailPassword" value="xxxxxxxxxx" />

I followed http://crunchify.com/java-mailapi-example-send-an-email-via-gmail-smtp/ when creating the email sender. 
If you are interested in how the default executor works you can refere source code for the default executor org.wso2.carbon.apimgt.impl.executors.APIExecutor in here

Once you created the custom executor, build .jar and deploy it in the wso2am-1.10.0/repository/components/lib location. 

I attached the sample custom-executor.zip for the reference

2. Create a custom lifecycle and deploy it.

First log in to Carbon management console and update the lifecycle configuration. Please refer  Extending the API Life Cycle on how to access that resource.

For this I use the default lifecycle and removed the "Deprecated" section and add the following section. Full lifecycle xml can be found in here

   <state id="Deprecated">
        <datamodel>
            <data name="transitionExecution">
                <execution forEvent="Notify Business Owner" class="org.wso2.carbon.apimgt.MailExecutor">
                    <parameter name="emailUsername" value="xxxxxxxxxx" />
                    <parameter name="emailPassword" value="xxxxxxxxxx" />
                </execution>
            </data>
        </datamodel>
        <transition event="Notify Business Owner" target="Notified"/>
    </state>
    <state id="Notified">
        <datamodel>
            <data name="transitionExecution">
                <execution forEvent="Retire"
                                       class="org.wso2.carbon.apimgt.impl.executors.APIExecutor"></execution>
            </data>
        </datamodel>
        <transition event="Retire" target="Retired"/>
    </state>

Note that I have used org.wso2.carbon.apimgt.MailExecutor instead of the default executor org.wso2.carbon.apimgt.impl.executors.APIExecutor  and passed the username password parameters in the <execution> section.

Provide valid email username and a password for this property
<parameter name="emailUsername" value="xxxxxxxxxx" />
<parameter name="emailPassword" value="xxxxxxxxxx" />

In this Lifecycle we have introduced a new state "Notified" and provided a transition event "Notify Business Owner" in the Deprecated state.

<transition event="Notify Business Owner" target="Notified"/>

Once user in the Deprecated state, a button will be displayed with the label Notify Business Owner to change the state to Notified

Note: add following entry to the wso2am-1.10.0/repository/deployment/server/jaggeryapps/publisher/site/conf/locales/jaggery/locale_default.json file. The key element is in the lower case. 

 "notify business owner" : "Notify Business Owner"

Test

The scenario is based on sending an email to the business owner of that api regarding API deprecation.

1. Create an API . See Create and Publish an API in the product documentation for more details.
2. Go to the Manage section in the publisher application and fill the Business Information section and save it. business owner email address is used to send the notification.


3. Go to the Overview section of the api and select the lifecycle tab. If you have published the api, It would show a "Deprecate" button. Select it and it would navigate to the newly created state.


Once you click this, User defined as the business owner would get an email


Thursday, April 2, 2015

Enable CORS on WSO2 Data Services Server (DSS)

CORS enable/disable feature does not come as an out of the box feature from WSO2 DSS. But this can be achieve by adding a cors filter. We can use the method described in cors filter installation document in DSS as well because DSS uses a tomcat server.

Step 1 : add necessary libraries to DSS

Download and copy cors-filter-2.4.jar and java-property-utils-1.9.1.jar files to the <dss_home>/repository/components/lib folder. Latest libraries can be found in this site.

Step 2 : Add CORS configuration to tomcat web.xml

Open  <dss_home>/repository/conf/tomcat/web.xml file and add CORS Filter declaration and mapping.

<filter>
   <filter-name>CORS</filter-name>
   <filter-class>com.thetransactioncompany.cors.CORSFilter</filter-class>
</filter>


<filter-mapping>
   <filter-name>CORS</filter-name>
   <url-pattern>/*</url-pattern>
</filter-mapping>


Step 3 : Restart the server


Tuesday, December 30, 2014

Customizing API Manager – Adding Workflow Extension

API Manager comes with capability to add custom workflows to user signup, application creation, registration and subscription. By default API manager comes with two workflows. Simple Workflow Executor and WS Workflow Executor. Simple workflow executor is the simplest one and it is enabled by default and it executes the default flow.
In WSO2 API Manager documentation, you will find a post regarding creating a custom workflow. In this post I’ll try to show in more details how this workflow process happens. Once you understand the process you could use this feature much more effectively in your own environment.
Workflows can be used to add extra steps in to the processes like self signup, application creation, etc. For example we can use a workflow for user self signup in the store and add extra steps to approve this user before giving him the permission to access the store. (the default process just create the user and grant him the rights to access the store). WS Workflow Executor has implemented this feature. The sample executor in the api manager documentation sends an email during the workflow. So we can do whatever we want. At the moment workflows can be used for only user signup, application creation, registration and subscription.
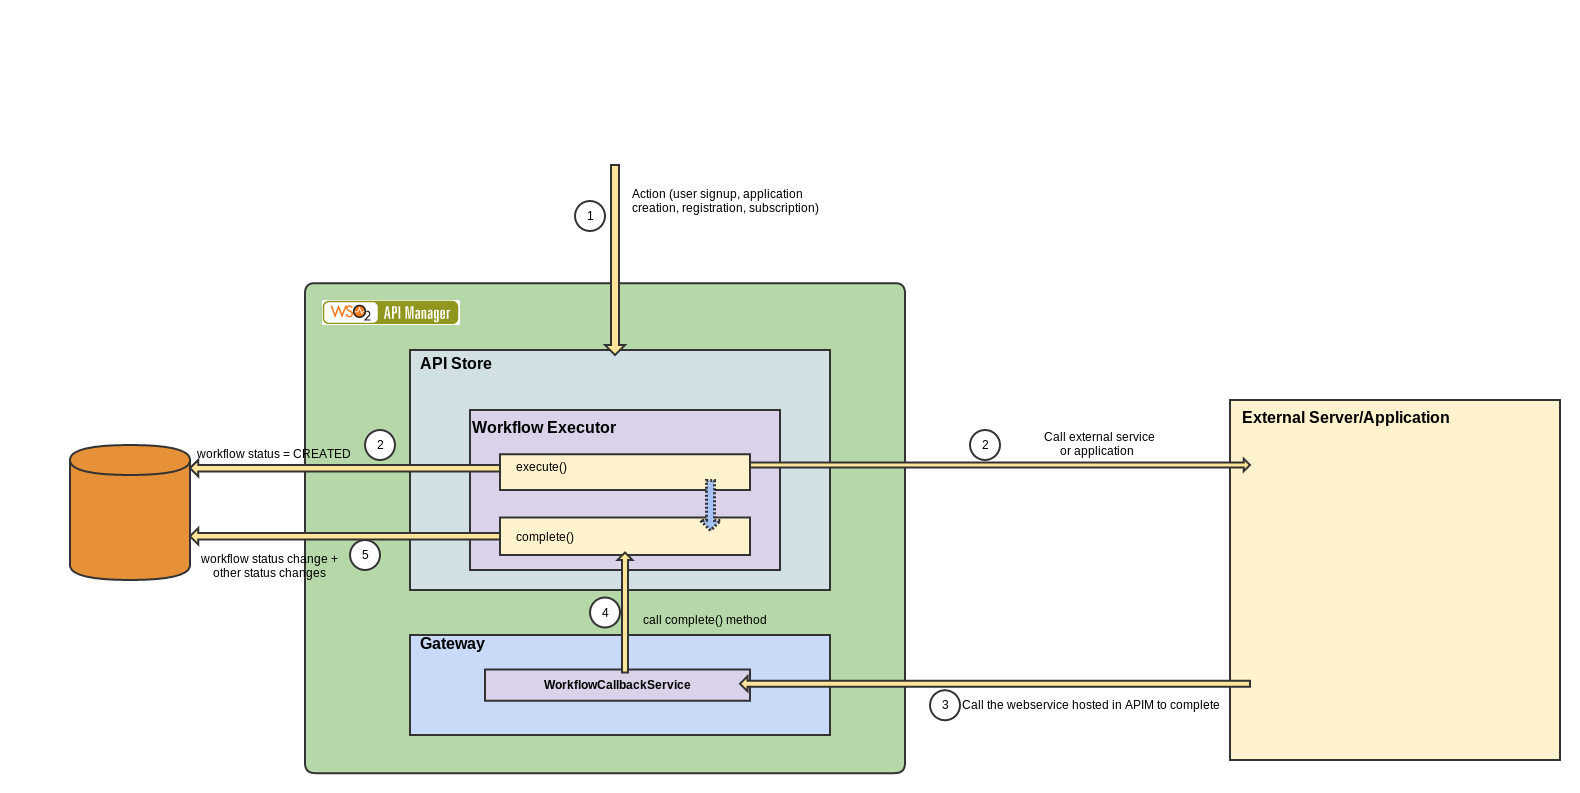
Following image describes the steps. Knowing the steps would make it easier to implement a custom workflow
workflow
When an action occurs (ex user signup, etc) API manager selects the executor to execute for that action. This is defined in the registry workflow-extension.xml file (refer https://docs.wso2.com/display/AM180/Adding+Workflow+Extensions)
Then it execute the execute() method first (please refer to the code example in https://docs.wso2.com/display/AM180/Customizing+a+Workflow+Extension). This method is called by the previous mentioned action. WorkflowDTO object is passed to this method which contains a unique reference id for that workflow (externalWorkflowReference) this reference needs to be there all the time to complete the execution.
All the custom executors should extend the base class WorkflowExecutor.
By calling the parent execute() method, an entry related to this workflow is added to the database with 'Created' as the status.
super.execute(workflowDTO);
Inside this method we could do our additional work. (sending email, etc). WS Workflow Executor which comes with API manager as one of the default executors sends a request to external business process server (WSO2 BPS) for an approval process.
We can also call the complete() method from the execute() method. This way we can finish the workflow from there (Simple Workflow Executor and the sample executor in the documentation use this method).
NOTE: some processes need to change their states in the complete stage. For example in application creation workflow you have to set the status of that application to ‘REJECTED’ or APPROVED in the complete() method (before the execute() method the application state is in ON_HOLD ).
Do not forget to call parent method at the end of the complete method
super.complete(workflowDTO);
API manager has deployed a web service to handle the situations where we call external applications (step 2 and 3). A web service'WorkflowCallbackService' is hosted to accept external requests related to workflows and call the complete() method.

The reference id I mentioned in the execute() method needs to be sent as workflowReference and status should be APPROVEDREJECTED or REGISTERED
WS Workflow Executor
WS Workflow Executor is one of the default executors in API manager. This can be used to add an approval/rejection process. WSO2 Busines Process Server is used as an external server to handle the approval process. The process is defined in BPL and deployed in WSO2 BPS. Following is the overall picture of how it is used. You could understand it with the previous information
workflow_ws