Tuesday, December 30, 2014

Customizing API Manager – Adding Workflow Extension

API Manager comes with capability to add custom workflows to user signup, application creation, registration and subscription. By default API manager comes with two workflows. Simple Workflow Executor and WS Workflow Executor. Simple workflow executor is the simplest one and it is enabled by default and it executes the default flow.
In WSO2 API Manager documentation, you will find a post regarding creating a custom workflow. In this post I’ll try to show in more details how this workflow process happens. Once you understand the process you could use this feature much more effectively in your own environment.
Workflows can be used to add extra steps in to the processes like self signup, application creation, etc. For example we can use a workflow for user self signup in the store and add extra steps to approve this user before giving him the permission to access the store. (the default process just create the user and grant him the rights to access the store). WS Workflow Executor has implemented this feature. The sample executor in the api manager documentation sends an email during the workflow. So we can do whatever we want. At the moment workflows can be used for only user signup, application creation, registration and subscription.
Following image describes the steps. Knowing the steps would make it easier to implement a custom workflow
workflow
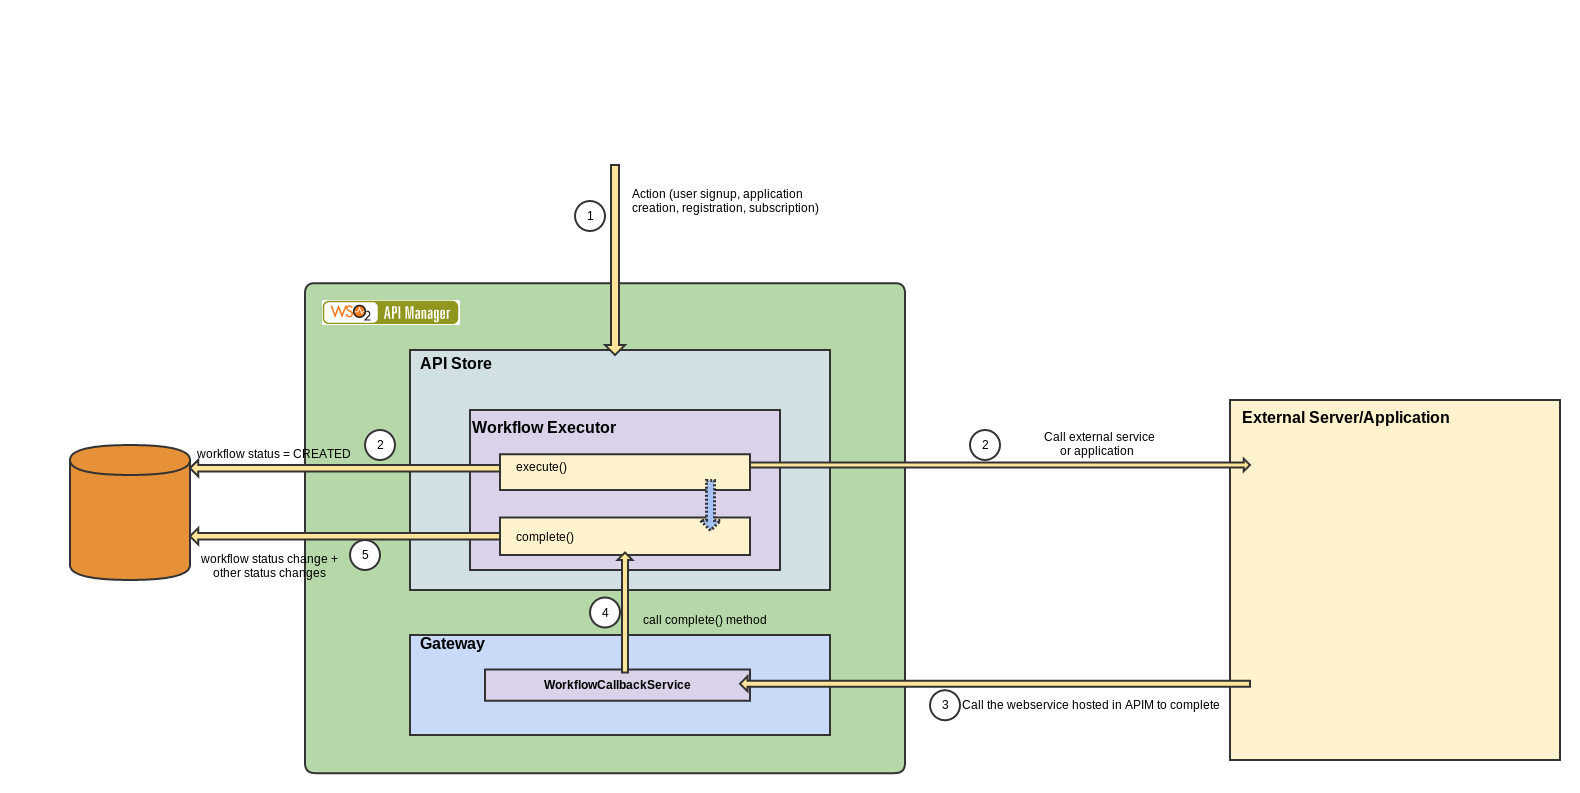
When an action occurs (ex user signup, etc) API manager selects the executor to execute for that action. This is defined in the registry workflow-extension.xml file (refer https://docs.wso2.com/display/AM180/Adding+Workflow+Extensions)
Then it execute the execute() method first (please refer to the code example in https://docs.wso2.com/display/AM180/Customizing+a+Workflow+Extension). This method is called by the previous mentioned action. WorkflowDTO object is passed to this method which contains a unique reference id for that workflow (externalWorkflowReference) this reference needs to be there all the time to complete the execution.
All the custom executors should extend the base class WorkflowExecutor.
By calling the parent execute() method, an entry related to this workflow is added to the database with 'Created' as the status.
super.execute(workflowDTO);
Inside this method we could do our additional work. (sending email, etc). WS Workflow Executor which comes with API manager as one of the default executors sends a request to external business process server (WSO2 BPS) for an approval process.
We can also call the complete() method from the execute() method. This way we can finish the workflow from there (Simple Workflow Executor and the sample executor in the documentation use this method).
NOTE: some processes need to change their states in the complete stage. For example in application creation workflow you have to set the status of that application to ‘REJECTED’ or APPROVED in the complete() method (before the execute() method the application state is in ON_HOLD ).
Do not forget to call parent method at the end of the complete method
super.complete(workflowDTO);
API manager has deployed a web service to handle the situations where we call external applications (step 2 and 3). A web service'WorkflowCallbackService' is hosted to accept external requests related to workflows and call the complete() method.

The reference id I mentioned in the execute() method needs to be sent as workflowReference and status should be APPROVEDREJECTED or REGISTERED
WS Workflow Executor
WS Workflow Executor is one of the default executors in API manager. This can be used to add an approval/rejection process. WSO2 Busines Process Server is used as an external server to handle the approval process. The process is defined in BPL and deployed in WSO2 BPS. Following is the overall picture of how it is used. You could understand it with the previous information
workflow_ws

Saturday, December 27, 2014

Customizing API Manager – Adding custom handlers

API Manager comes with a built in ESB. It acts as the gateway and handles all the api calls. API creator can manipulate the requests before they are sent back to the actual back end by configuring the api gateway. Handlers can be used to achieve this task.
There are some default handlers added to an api once it is created. To check this first create and publish an api by login in to API manager publisher and then go to the <AM_HOME>/repository/deployment/server/synapse-configs/default/api location. If the api is created successfully, there will be an xml file with the name of the api in this location (creator_name_version.xmlwould be the exact name ). Under the <hanlders> element, all the default handlers are defined. These handlers execute (in the order) first once a request hits the api before sending it to the back end.
handlers
These handlers handle different tasks related to the api call. First handler handles the authentication part of the request. For example, to call an published api, we need to use an access token ( adding it to the Authorization header of the request). APIAuthenticationHandler handler is used to validate the token and reject invalid requests.
Adding a custom handler to an existing api
api creator may need to add his own processing. (for example validate some other headers) . He can develop a custom handler and plug it in to the api. Tutorial on creating a custom handler can be found in the Api manager documentation. After creating the handler, put it in to the<AM_HOME>/repository/components/lib folder and insert an entry inside the <handlers> element
<handler class="org.wso2.customhandlers.testhandler"/>
Note: To build the custom handler you need the have the synapse libraries in the class path. You can point to<AM_HOME>/repository/components/plugins folder for this.
Adding a custom handler to all the apis.
If this handler needs to be added to every new api, then it is not practical to add it manually once the api is created. API manager provides templates to define the structure of the api and we can modify this to have the custom handler as a default handler. This way every api will have the custom handler inside the<handlers> element
For this we need to modify the velocity_template.xml file in the<AM_HOME>/repository/resources/api_templates/ location. Open it and find the location '<handlers>'
template_old
Add the custom handler inside the <handlers> element after the #end tag. This will add the custom handler after the default handlers.
template_new

Friday, December 26, 2014

Self signup for tenants – API manager 1.8

Api manager comes with user signup feature for user store by accessing API store application. One limitation  in Api Manager 1.7 was that users were able to  signup only to super user’s API store. Tenant users were added through the management console. Api Manager 1.8 comes with the self signup feature for tenant store as well.
store.png
To enable self signup in AM 1.7, admin has to modify following configuration in the api-manager.xml file in <AM_HOME>/repository/conf
old_config
This is removed from api-manager.xml configuration file and moved to registry location. For each tenant doman there is a sign-up-config.xml configuration file. Tenant admin can log in to the management console and edit this configuration. This way each tenant domain can have different configurations for self signup.
The configuration file related to self signup in Api Manager 1.8. this can be found in the ‘/_system/governance/apimgt/applicationdata/sign-up-config.xml‘ registry location. Login to http://localhost:9443/carbon by using tenant admin credentials
reg_location
following is the configuration file
new_config
To enable self signup for tenant API store <EnableSingup> element needs to be ‘true’. Otherwise the self signup option would not be visible in the tenant store. This is ‘true’ by default for super tenant.
AM 1.8 provides option to set the user storage to store these users.<SignUpDomain> defines this. PRIMARY refers to the primary user store. This can be pointed to secondary user store as well. More on creating user stores can be found in API manager documentation related to configuring secondary user stores . The Domain name used for that user store can be used in <SignUpDomain>
<SignUpRoles> defines the roles that are assigned to the users. AM 1.8 provides facility to assign more than one role for the user by adding <SignUpRole> element inside the <SignUpRoles> element.
NOTE: These roles are not created automatically so these roles needed to be created by the admin user. See more on how to create user roles and assigning permission.
IMPORTANT: At least one role has to have ‘subscriber’ permission. Otherwise user won’t be able to login to the tenant store.
After configuring this, you will be able to see the self signup button in the tenant API store
This feature can be extended by enabling user signup in workflow extension . This will enable an approval process for newly Signed up users. More information on this can be found in Api Manager documentation